將專案加入Git版控並上傳至遠端儲存庫
假設情況:想像你們團隊目前已經有一個專案,已經開發半年了,這時候主管去外訓,得知Git版控非常的好,他想使用Git來做專案程式碼的版控讓大家一起開發,請你好好研究如何將專案加入Git版控
目的:讓團隊可以更有效率的合作開發,並了解彼此之間修改的程式碼內容
處理方式:有兩種方法來將專案加入Git版控,以下使用TortoiseGit與Bitbucket示範
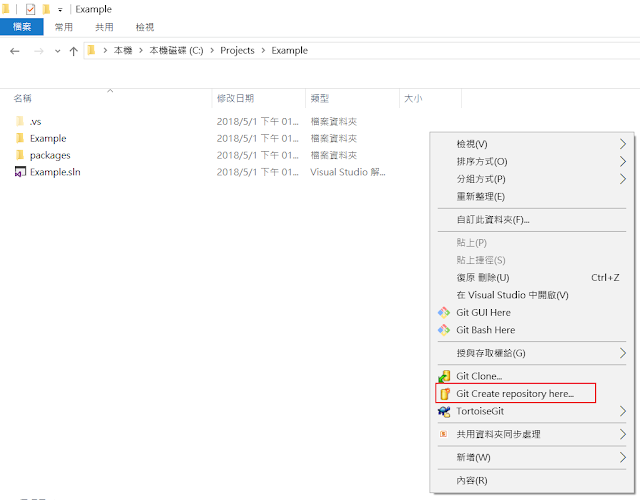
操作方法:在資料夾空白處按右鍵,選擇Git Create repository here
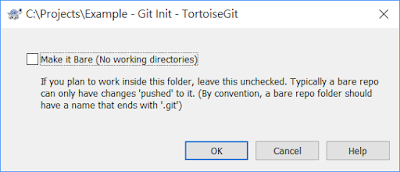
不要勾選 Make it Bare,按下OK。
若勾選的話是代表這個資料夾是專門拿來做版控的儲存中心,下文會提到,將使用Bitbucket來作為Remote Repository,能讓開發成員取得同一份程式碼
資料夾會自動產生一個名稱為.git的資料夾
代表專案已經可以開始使用Git版控囉!而這個包含.git的資料夾就是版控的工作區

若沒有看到.git資料夾的話,可以檢查一下資料夾設定是否有允許顯示隱藏的項目

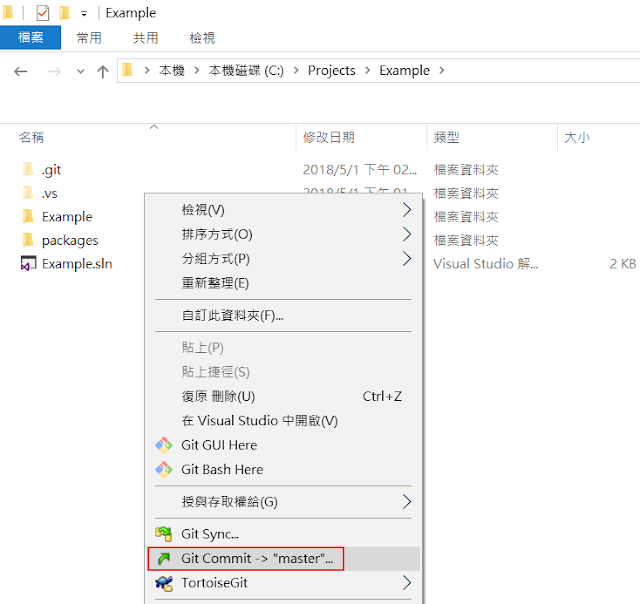
接下來就是將專案內的程式碼加入版控,使用Git Commit來提交一個版本
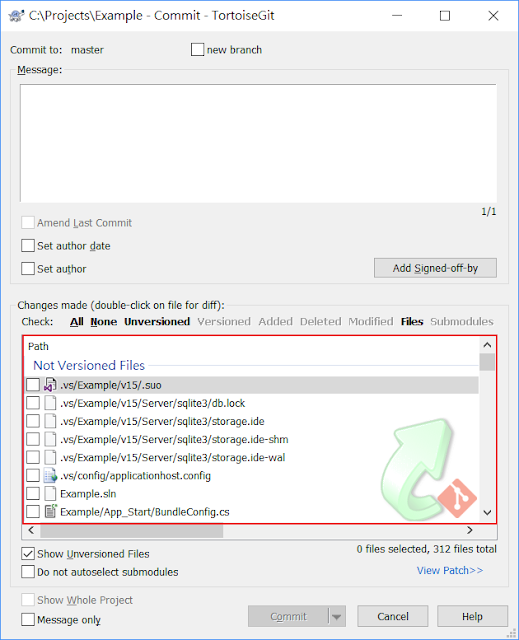
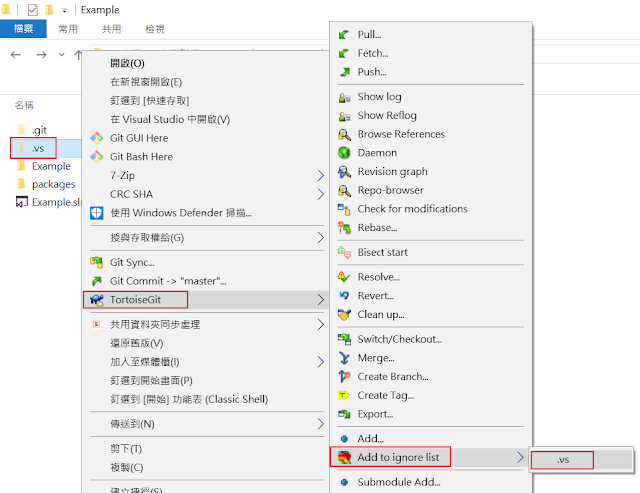
勾選要加入此版本的程式碼,此時可以瀏覽一下檔案清單,如果有看到某些檔案是不想加入版控的,可以使用.gitignore來忽略它,例如下圖的.vs資料夾會根據使用者的電腦不同而有不同的內容,所以不適合加入版控,必須忽略它。先將下圖視窗案取消
點選.vs資料夾後按滑鼠右鍵,將.vs資料夾加入ignore list
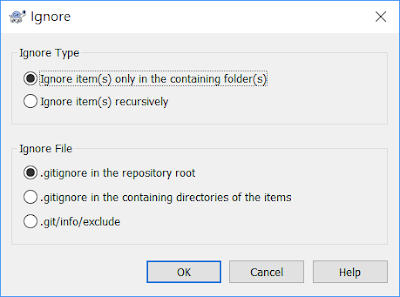
將著選取忽略的方式,
Ignore Type:
忽略檔案的方式是針對這個單一的項目,還是其他資料夾內若也有相同的項目也要一併忽略,
例如:專案每個資料夾內都有一個readme.txt檔案,
ignore item(s) only in the containing folder(s):只是想排除特定一個
ignore item(s) recursively:想忽略全部的readme.txt,git會將整個工作區內的readme.txt忽略
Ignore File:
ignore list是由一個叫做.gitignore的檔案再管理的,此選項是在問你,此檔案要自動產生在哪裡
.gitignore in the repository root:存在工作區
.gitignore in the containing directories of the items:存在指定的資料夾
.git/info/exclude:存在.git資料夾內
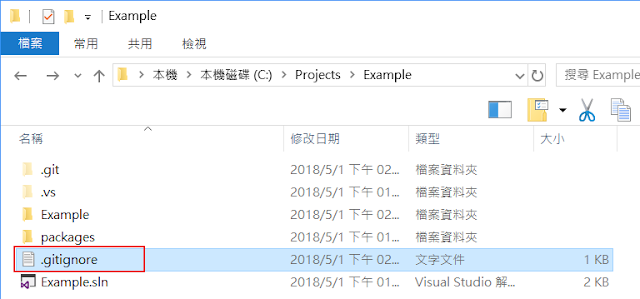
按下OK,.gitignore檔案自動產生
另外網路上也有很多人分享他們的.gitignore檔案,
例如:https://gist.github.com/indyfromoz/4109296,這是ASP.NET MVC的.gitignore檔案,可以自行下載之後放到工作區內
設定好忽略清單之後,就可以來提交版本了
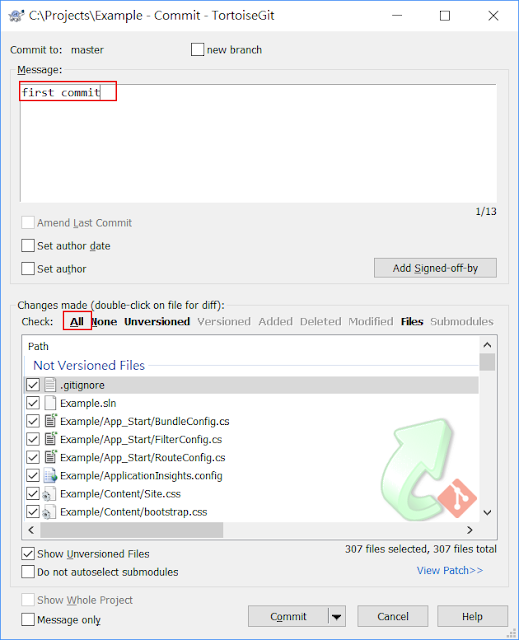
會看到下面要加入的檔案清單已經沒有顯示.vs資料夾內的檔案了,可以點選All來選取全部檔案,或根據自己的需求自行勾選,完成之後請記得要在Messge欄位輸入訊息,好讓同事了解你這次的版本是異動什麼內容,完成之後按下Commit按鈕
Commit成功的畫面,代表你已經成功加入一個版本紀錄
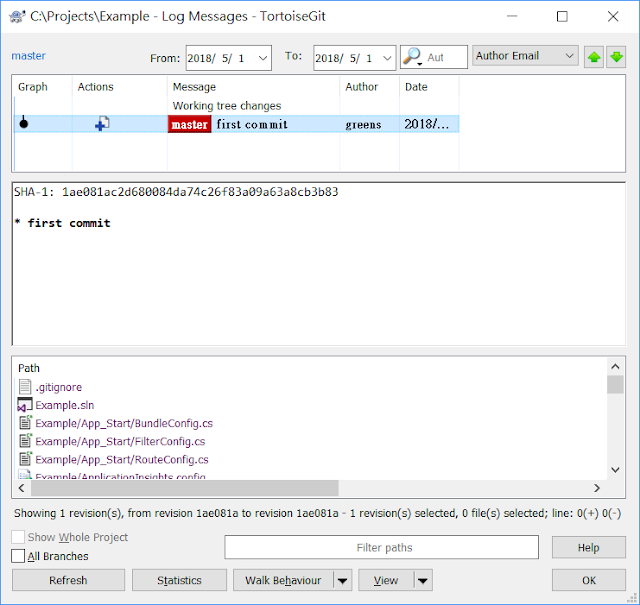
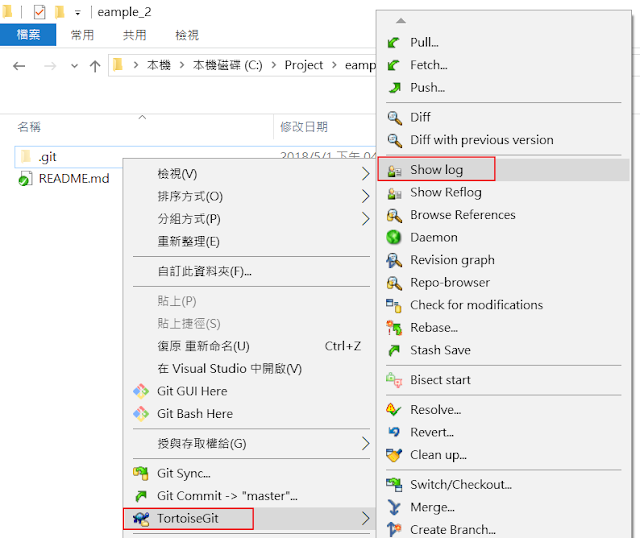
查看版本紀錄,在工作區空白處按右鍵,選擇Show log
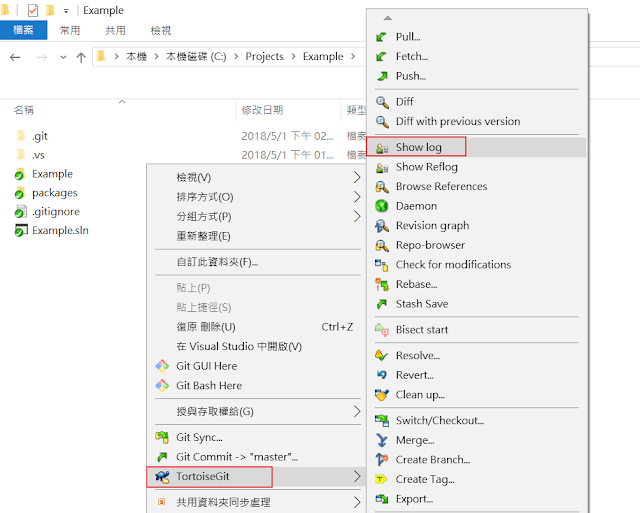
就可以看到什麼人在什麼時間點做了什麼修改
現在已經成功將專案加入Git版控了,接下來,要怎麼讓開發團隊一起使用這份版控呢?有兩中方式,一種就是使用區域網路的方式來共享,或是使用自己架設或第三方提供遠端儲存庫(Remote Repository)的服務,以下就以Bitbucket來示範,如何將自己的專案上傳到Remote Repository,然後與同事協同開發專案程式碼。
註冊Bitbucket帳號
https://bitbucket.org
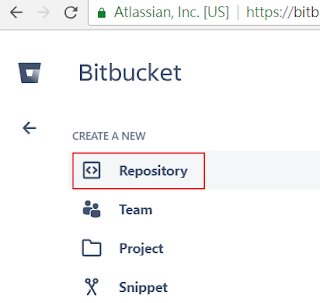
建立Repository
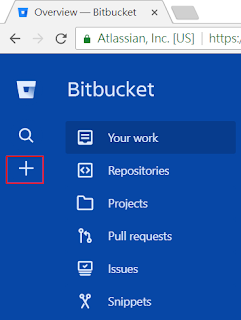
於左區按+按鈕後,點選Repository
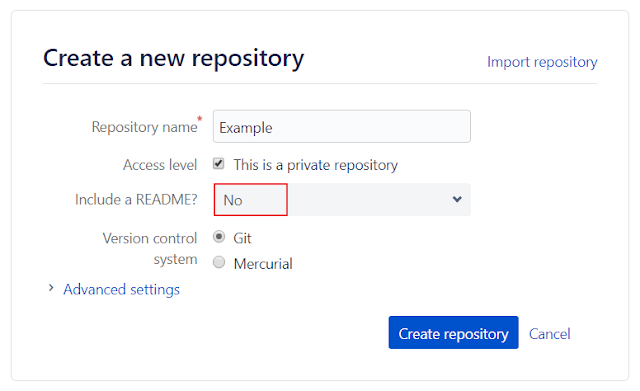
輸入儲存庫的名稱,選取存取權限為公開或私密,請不要加入README檔案,保持這個儲存庫是完全空白沒有任何版本紀錄的,按下Create就可以完成儲存庫的建立囉!
點選右上角的儲存庫名稱,就會顯示遠端儲存庫的網址,畫面上也有提供訊息,提示你可以將local的儲存庫push到這個遠端儲存庫,也就是接下來的內容要講解的部分
在這邊要進行網址的複製時要特別注意,@前面的使用者帳號如果不是你的帳號請不要複製,否則在後續操作git指令時會自動帶入使用者的帳號
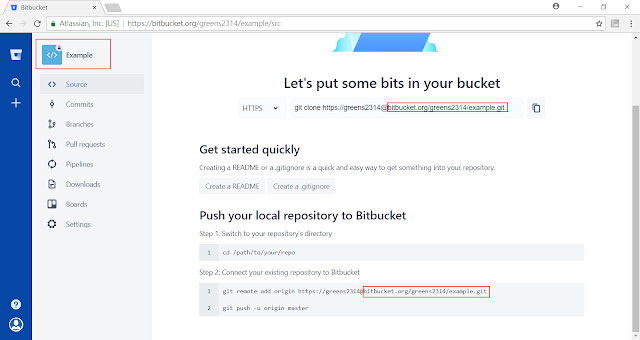
完成遠端儲存庫的建立之後,要將本機的版控上傳到遠端儲存庫,由上圖可以得知,遠端儲存庫的位置在 http://bitbucket.org/greens2314/example.git,接下來要設定Git遠端儲存庫的位置
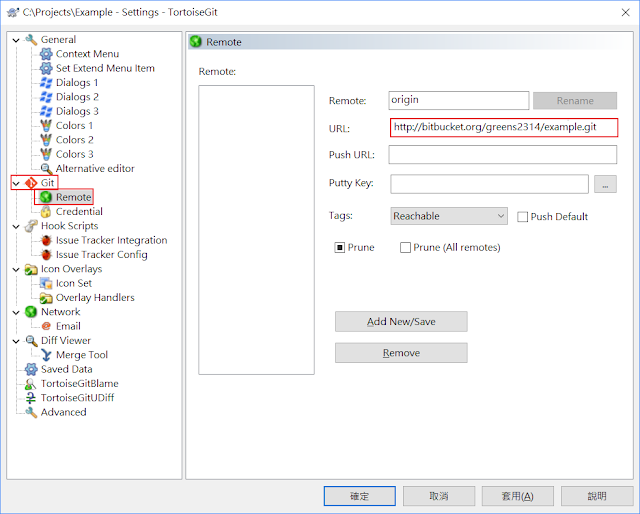
工作區空白處按右鍵 > TortoiseGit > Settings

點選右邊的Git > Remote,直接在URL上面貼上遠端儲存庫的網址,按下確定即可
將本機的版本紀錄上傳至遠端儲存庫,使用git push
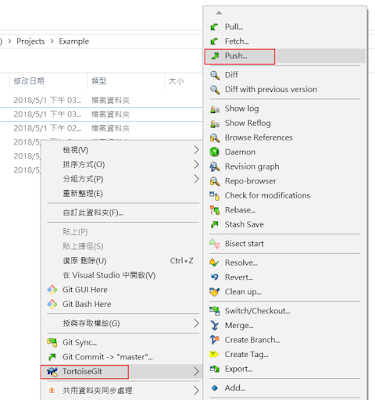
Remote的origin就是剛剛在Settings裡面設定的URL,按下OK就會開始上傳
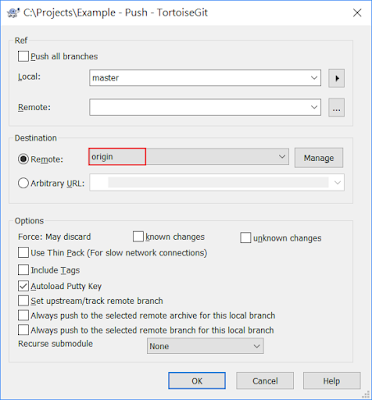
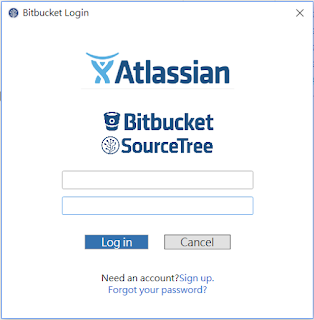
上傳過程可能會要求你登入帳號密碼,請依照指示動作即可
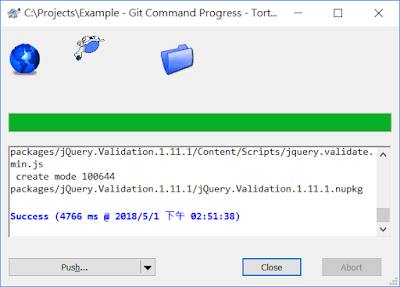
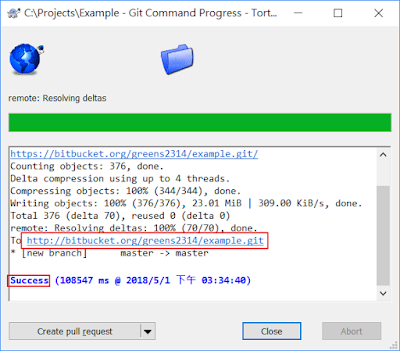
上傳成功,會顯示遠端儲存庫的位址與上傳訊息
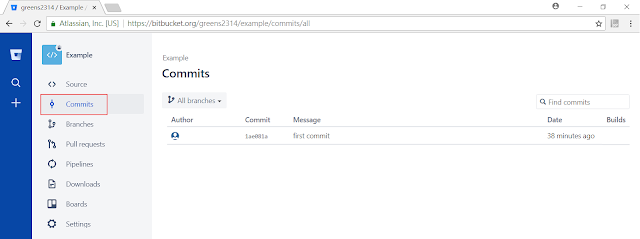
到Bitbucket查看Commit就會版本紀錄
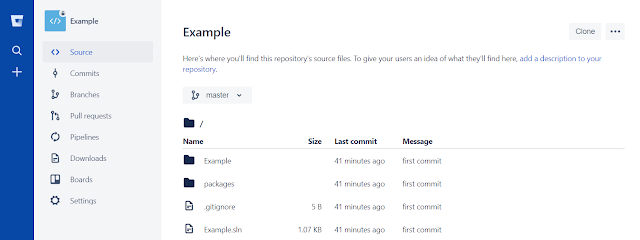
Source則可以查看程式碼
接著你就能分享你的遠端儲存庫的URL啦,請同事們clone下來就可以一起開發囉!
目的:讓團隊可以更有效率的合作開發,並了解彼此之間修改的程式碼內容
處理方式:有兩種方法來將專案加入Git版控,以下使用TortoiseGit與Bitbucket示範
1. init 儲存庫 > 上傳到遠端儲存庫
在專案資料夾內產生一個.git的資料夾,這個資料夾就是負責做版控管理的操作方法:在資料夾空白處按右鍵,選擇Git Create repository here

不要勾選 Make it Bare,按下OK。
若勾選的話是代表這個資料夾是專門拿來做版控的儲存中心,下文會提到,將使用Bitbucket來作為Remote Repository,能讓開發成員取得同一份程式碼

資料夾會自動產生一個名稱為.git的資料夾
代表專案已經可以開始使用Git版控囉!而這個包含.git的資料夾就是版控的工作區

若沒有看到.git資料夾的話,可以檢查一下資料夾設定是否有允許顯示隱藏的項目

接下來就是將專案內的程式碼加入版控,使用Git Commit來提交一個版本

勾選要加入此版本的程式碼,此時可以瀏覽一下檔案清單,如果有看到某些檔案是不想加入版控的,可以使用.gitignore來忽略它,例如下圖的.vs資料夾會根據使用者的電腦不同而有不同的內容,所以不適合加入版控,必須忽略它。先將下圖視窗案取消

點選.vs資料夾後按滑鼠右鍵,將.vs資料夾加入ignore list

將著選取忽略的方式,
Ignore Type:
忽略檔案的方式是針對這個單一的項目,還是其他資料夾內若也有相同的項目也要一併忽略,
例如:專案每個資料夾內都有一個readme.txt檔案,
ignore item(s) only in the containing folder(s):只是想排除特定一個
ignore item(s) recursively:想忽略全部的readme.txt,git會將整個工作區內的readme.txt忽略
Ignore File:
ignore list是由一個叫做.gitignore的檔案再管理的,此選項是在問你,此檔案要自動產生在哪裡
.gitignore in the repository root:存在工作區
.gitignore in the containing directories of the items:存在指定的資料夾
.git/info/exclude:存在.git資料夾內

按下OK,.gitignore檔案自動產生
另外網路上也有很多人分享他們的.gitignore檔案,
例如:https://gist.github.com/indyfromoz/4109296,這是ASP.NET MVC的.gitignore檔案,可以自行下載之後放到工作區內

設定好忽略清單之後,就可以來提交版本了
會看到下面要加入的檔案清單已經沒有顯示.vs資料夾內的檔案了,可以點選All來選取全部檔案,或根據自己的需求自行勾選,完成之後請記得要在Messge欄位輸入訊息,好讓同事了解你這次的版本是異動什麼內容,完成之後按下Commit按鈕

Commit成功的畫面,代表你已經成功加入一個版本紀錄

查看版本紀錄,在工作區空白處按右鍵,選擇Show log

就可以看到什麼人在什麼時間點做了什麼修改

現在已經成功將專案加入Git版控了,接下來,要怎麼讓開發團隊一起使用這份版控呢?有兩中方式,一種就是使用區域網路的方式來共享,或是使用自己架設或第三方提供遠端儲存庫(Remote Repository)的服務,以下就以Bitbucket來示範,如何將自己的專案上傳到Remote Repository,然後與同事協同開發專案程式碼。
註冊Bitbucket帳號
https://bitbucket.org
建立Repository
於左區按+按鈕後,點選Repository


輸入儲存庫的名稱,選取存取權限為公開或私密,請不要加入README檔案,保持這個儲存庫是完全空白沒有任何版本紀錄的,按下Create就可以完成儲存庫的建立囉!

點選右上角的儲存庫名稱,就會顯示遠端儲存庫的網址,畫面上也有提供訊息,提示你可以將local的儲存庫push到這個遠端儲存庫,也就是接下來的內容要講解的部分
在這邊要進行網址的複製時要特別注意,@前面的使用者帳號如果不是你的帳號請不要複製,否則在後續操作git指令時會自動帶入使用者的帳號

完成遠端儲存庫的建立之後,要將本機的版控上傳到遠端儲存庫,由上圖可以得知,遠端儲存庫的位置在 http://bitbucket.org/greens2314/example.git,接下來要設定Git遠端儲存庫的位置
工作區空白處按右鍵 > TortoiseGit > Settings


將本機的版本紀錄上傳至遠端儲存庫,使用git push

Remote的origin就是剛剛在Settings裡面設定的URL,按下OK就會開始上傳

上傳過程可能會要求你登入帳號密碼,請依照指示動作即可

上傳成功,會顯示遠端儲存庫的位址與上傳訊息

到Bitbucket查看Commit就會版本紀錄

Source則可以查看程式碼

接著你就能分享你的遠端儲存庫的URL啦,請同事們clone下來就可以一起開發囉!
2.clone 儲存庫 > 上傳到遠端儲存庫
方法1是使用git init來產生.git資料夾,而方法2則是使用git clone來產生.git資料夾
註冊Bitbucket帳號
https://bitbucket.org
建立Repository
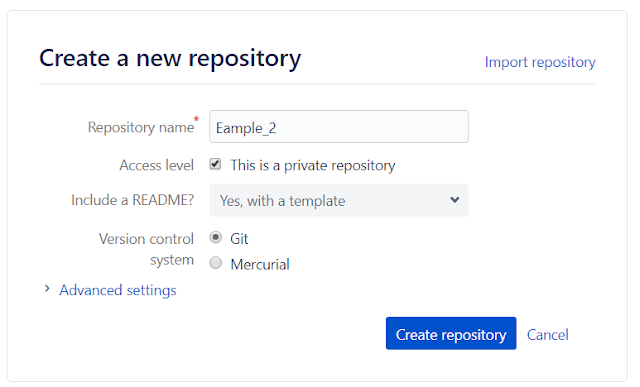
於左區按+按鈕後,點選Repository
輸入儲存庫的名稱,選取存取權限為公開或私密,README檔案可視自己的需求評估加入與否,與方式1不一樣,這邊可以加也可以不加,不需要保持這個儲存庫是完全空白沒有任何版本紀錄的,按下Create就可以完成儲存庫的建立囉!
按右上角的儲存庫名稱,會發現與方式1的畫面不太一樣,因為此儲存庫在建立時,有勾選要包含README.md檔案,也就代表第一個版本紀錄是在遠端儲存庫產生的內容是加入README.md檔案,而方式1的第一個版本紀錄是在本機端產生的,所以下圖畫面會請你直接clone儲存庫。
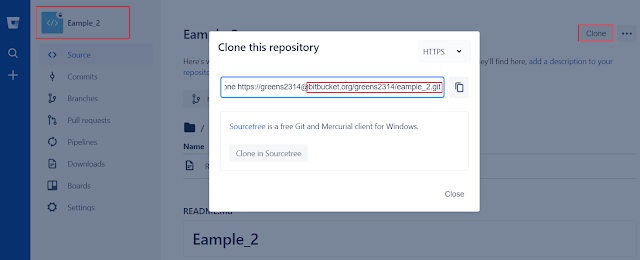
儲存庫網址,記得上述提過的@前面是使用者帳號,如果不是你的帳號請不要複製,而URL則為https://bitbucket.org/greens2314/eample_2.git即可
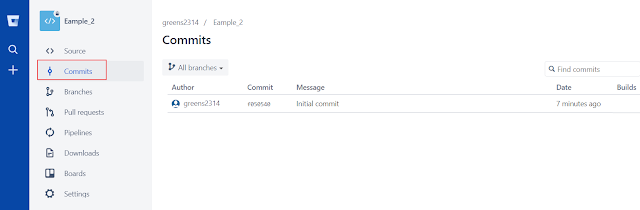
查看Commit紀錄,第一筆為遠端自動產生
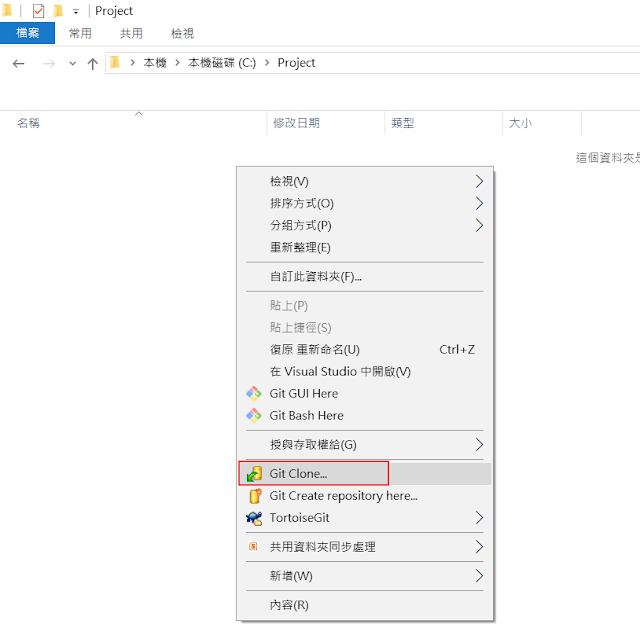
空白處按右鍵,Clone遠端的儲存庫
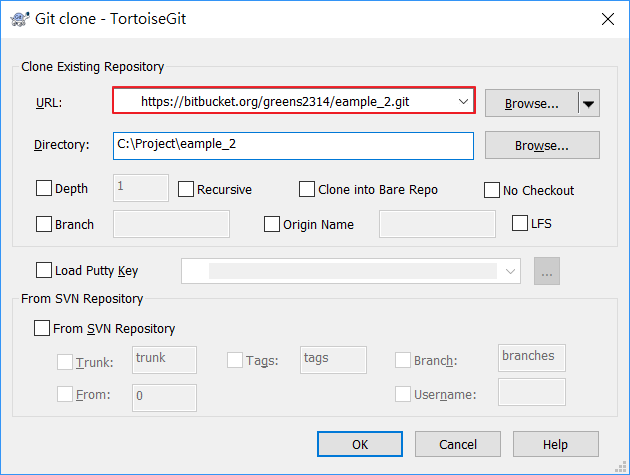
URL欄位貼上遠端儲存庫網址,按OK
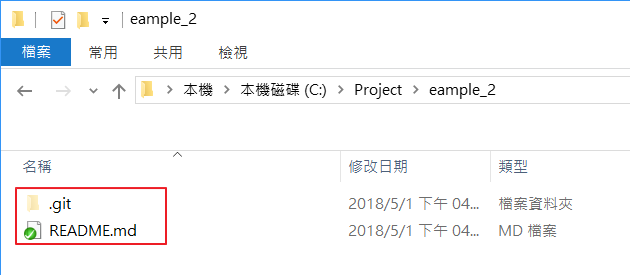
查看資料夾,裡面會包含.git資料夾與README.md檔案
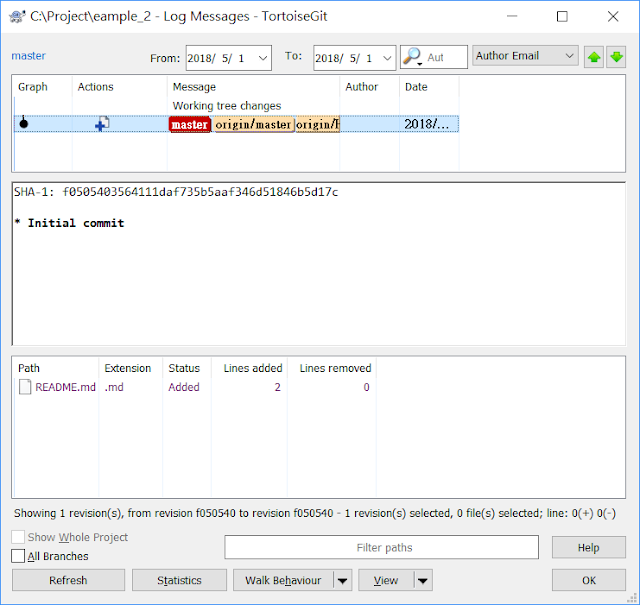
查看log
log結果與遠端儲存庫內容一致,第一個版本紀錄的內容為增加一個README.md檔案
接著就可以來準備新增版本紀錄啦,請將現有的專案程式碼通通複製到這個clone下來的資料夾內,然後進行git commit跟git push就可以完成專案程式碼的上傳囉!
https://bitbucket.org
建立Repository
於左區按+按鈕後,點選Repository
輸入儲存庫的名稱,選取存取權限為公開或私密,README檔案可視自己的需求評估加入與否,與方式1不一樣,這邊可以加也可以不加,不需要保持這個儲存庫是完全空白沒有任何版本紀錄的,按下Create就可以完成儲存庫的建立囉!

按右上角的儲存庫名稱,會發現與方式1的畫面不太一樣,因為此儲存庫在建立時,有勾選要包含README.md檔案,也就代表第一個版本紀錄是在遠端儲存庫產生的內容是加入README.md檔案,而方式1的第一個版本紀錄是在本機端產生的,所以下圖畫面會請你直接clone儲存庫。
儲存庫網址,記得上述提過的@前面是使用者帳號,如果不是你的帳號請不要複製,而URL則為https://bitbucket.org/greens2314/eample_2.git即可

查看Commit紀錄,第一筆為遠端自動產生

空白處按右鍵,Clone遠端的儲存庫

URL欄位貼上遠端儲存庫網址,按OK

查看資料夾,裡面會包含.git資料夾與README.md檔案

查看log

log結果與遠端儲存庫內容一致,第一個版本紀錄的內容為增加一個README.md檔案

接著就可以來準備新增版本紀錄啦,請將現有的專案程式碼通通複製到這個clone下來的資料夾內,然後進行git commit跟git push就可以完成專案程式碼的上傳囉!


留言
張貼留言